实时警报通知:微信告警通知的重要性解析
963
2023-01-23
本文讲述了Nagios篇之Nagios服务关联飞书实现消息告警,nagios告警信息写入oracle数据库。
一、前言
通常情况下,我们在利用Nagios监控来做服务器监控时,告警是必不可少的,以便于运维人员能够及时发现异常,进而处理问题,所以关联Nagios就变得极为重要。
Nagios关联告警的形式很多,可以进行短信推送,钉钉推送,飞书推送等。
Nagios关联钉钉推送的之前有介绍过,可以参考我的这篇文章:
Nagios关联钉钉实现消息告警
二、实现步骤
今天这里就介绍下Nagios关联飞书进行告警:
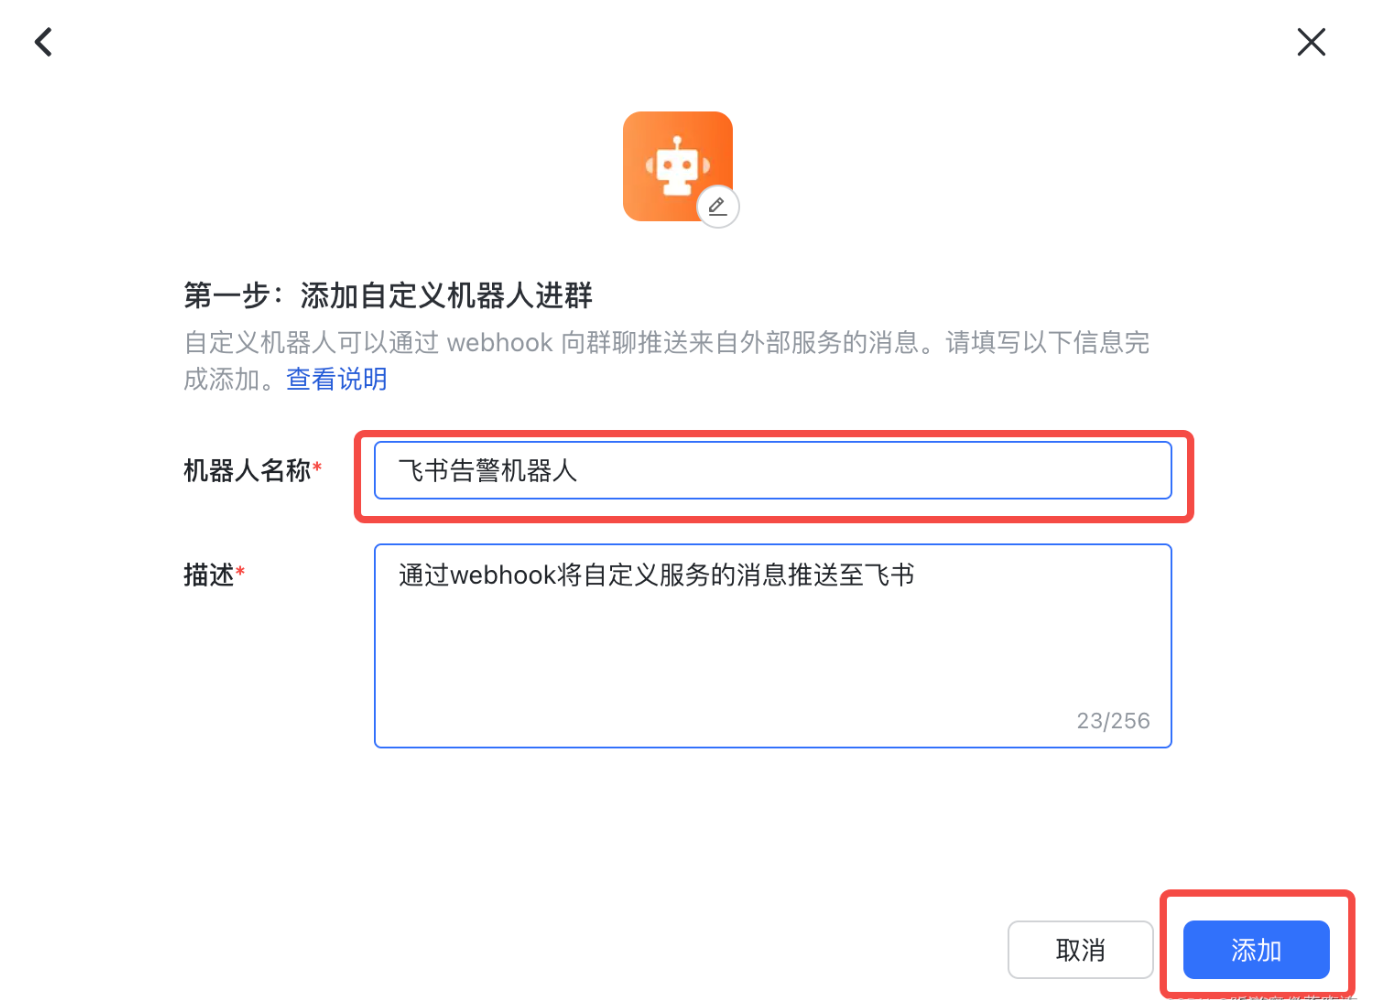
1、首先必须有飞书群来进行通知
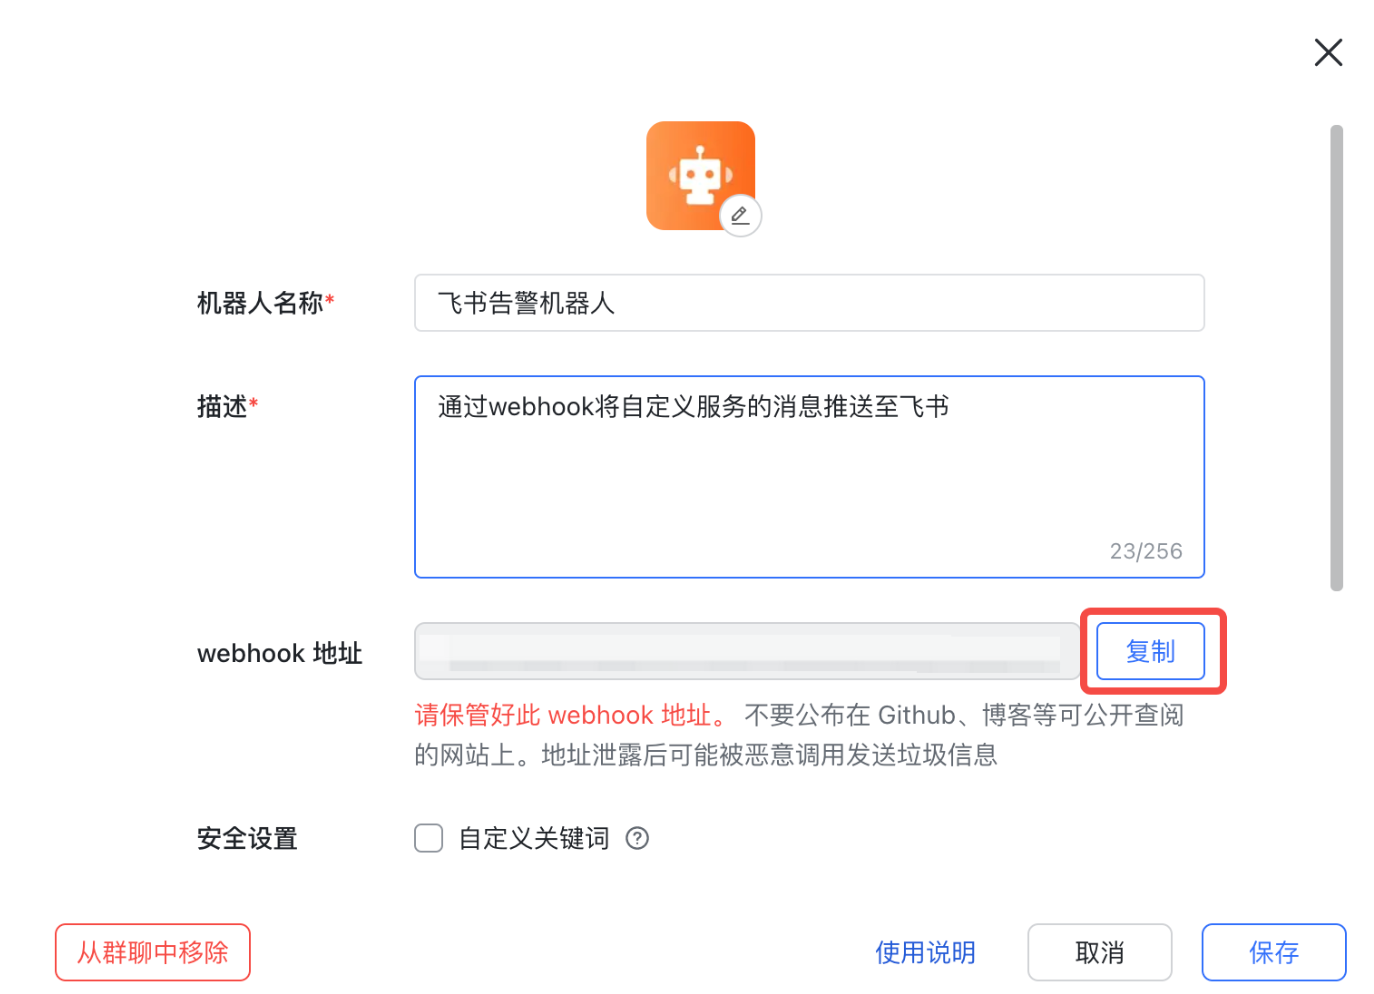
在飞书群中添加自定义机器人进群。如下所示:

2、复制对应的webhook地址,用请求的方式往这个地址发送告警信息

3、基于代码与Nagios服务进行关联
这里采用Python实现功能
import requests
import json
'''
警告类型: $NOTIFICATIONTYPE$
服务名称: $SERVICEDESC$
主机名: $HOSTALIAS$
IP地址: $HOSTADDRESS$
服务状态: $SERVICESTATE$
时间: $LONGDATETIME$
日志: $SERVICEOUTPUT$
'''
# 获取系统变量
warning_type=str(sys.argv[1])
service_name=str(sys.argv[2])
host_name=str(sys.argv[3])
host_IP=str(sys.argv[4])
service_state=str(sys.argv[5])
warning_time=str(sys.argv[6])
warning_log=str(sys.argv[7])
class FeishuAlert():
def __init__(self):
self.webhook="替换成个人的飞书群webhook地址,即可运行"
self.headers={'Content-Type': 'application/json'}
def post_to_robot(self):
# webhook:飞书群地址url
webhook=self.webhook
# headers: 请求头
headers=self.headers
# alert_headers: 告警消息标题
alert_headers="飞书告警"
# alert_content: 告警消息内容,用户可根据自身业务内容,定义告警内容
alert_content="** Nagios警报 **\n\n警告类型: {}\n服务名称: {}\n主机名: {}\nIP地址: {}\n服务状态: {}\n时间: {}\n日志:\n{}".format( warning_type,service_name,host_name,host_IP,service_state,warning_time,warning_log)
# message_body: 请求信息主体
message_body={
"msg_type": "interactive",
"card": {
"config": {
"wide_screen_mode": True
},
"elements": [
{
"tag": "div",
"text": {
"content":alert_content,
"tag": "lark_md"
}
}
],
"header": {
"template": "red",
"title": {
"content":alert_headers,
"tag": "plain_text"
}
}
}}
response = requests.request("POST", webhook, headers=headers, data=json.dumps(message_body),verify=False)
print(response)
if __name__ == '__main__':
alert=FeishuAlert()
alert.post_to_robot()
'''
"msg_type"参数说明: 飞书告警目前只支持类型4个参数
post 富文本
image 图片
share_chat 分享群名片
interactive 消息卡片
"template"参数说明: 主体颜色
'''
4、定义nagios配置文件 command.cfg
在这里进行定义server端的command definition
这里采用的是基于python来执行对应的脚本 实现告警功能触发
# 'nagios_feishu' service command definition
define command{
command_name notify-service-by-feishu
command_line /opt/ActivePython-2.7/bin/python /opt/nagios/nagios/libexec/nagios_feitalk.py "$NOTIFICATIONTYPE$" "$SERVICEDESC$" "$HOSTALIAS$" "$HOSTADDRESS$" "$SERVICESTATE$" "$LONGDATETIME$" "$SERVICEOUTPUT$"
}
# 'nagios_feishu' host command definition
define command{
command_name notify-host-by-feishu
command_line /opt/ActivePython-2.7/bin/python /opt/nagios/nagios/libexec/nagios_feitalk.py "$NOTIFICATIONTYPE$" "$SERVICEDESC$" "$HOSTALIAS$" "$HOSTADDRESS$" "$SERVICESTATE$" "$LONGDATETIME$" "$SERVICEOUTPUT$"
}
5、接下来也是最重要的,告警推送定义联系人以及组 , contact.cfg
用来定义Nagios 推送的用户以及用户组 ,并且进行定义server端在进行推送时的notification commands,
如下:
define contact{
contact_name show_sbml
use generic-contact
alias Nagios Admin
host_notifications_enabled 1
service_notifications_enabled 1
service_notification_period worktime
host_notification_period worktime
service_notification_options u,c,r
host_notification_options d,u,r
service_notification_commands notify-service-by-email,notify-service-by-feishu
host_notification_commands notify-host-by-email
email 27f42b1aa9e5db256cebd5998d4f47b01f0d1234de23ca5ee7ae671f106d27b2
can_submit_commands 1
}
define contactgroup{
contactgroup_name feishu
alias Nagios Administrators
members show_sbml,admins
}
6、定义nagios通知时区,timeperiods.cfg
为了保证时区准确,以及告警时间的时效性,这里时区的定义也是至于重要的。
###############################################################################
# TIMEPERIODS.CFG - SAMPLE TIMEPERIOD DEFINITIONS
#
# Last Modified: 05-31-2007
#
# NOTES: This config file provides you with some example timeperiod definitions
# that you can reference in host, service, contact, and dependency
# definitions.
#
# You don't need to keep timeperiods in a separate file from your other
# object definitions. This has been done just to make things easier to
# understand.
#
###############################################################################
###############################################################################
###############################################################################
#
# TIME PERIODS
#
###############################################################################
###############################################################################
# This defines a timeperiod where all times are valid for checks,
# notifications, etc. The classic "24x7" support nightmare. :-)
define timeperiod{
timeperiod_name 24x7
alias 24 Hours A Day, 7 Days A Week
sunday 00:00-24:00
monday 00:00-24:00
tuesday 00:00-24:00
wednesday 00:00-24:00
thursday 00:00-24:00
friday 00:00-24:00
#saturday 09:30-24:00
saturday 00:00-24:00
}
define timeperiod{
timeperiod_name everyday_morning
alias everyday_morning
sunday 08:00-09:00
monday 08:00-09:00
tuesday 08:00-09:00
wednesday 08:00-09:00
thursday 08:00-09:00
friday 08:00-09:00
saturday 08:00-09:00
}
define timeperiod{
timeperiod_name everyday_Work
alias everyday_Work
sunday 09:00-18:00
monday 09:00-18:00
tuesday 09:00-18:00
wednesday 09:00-18:00
thursday 09:00-18:00
friday 09:00-18:00
saturday 09:00-18:00
}
# 'workhours' timeperiod definition
define timeperiod{
timeperiod_name workhours
alias Normal Work Hours
monday 09:00-17:00
tuesday 09:00-17:00
wednesday 09:00-17:00
thursday 09:00-17:00
friday 09:00-17:00
}
# 'none' timeperiod definition
define timeperiod{
timeperiod_name none
alias No Time Is A Good Time
}
# Some U.S. holidays
# Note: The timeranges for each holiday are meant to *exclude* the holidays from being
# treated as a valid time for notifications, etc. You probably don't want your pager
# going off on New Year's. Although you're employer might... :-)
define timeperiod{
name us-holidays
timeperiod_name us-holidays
alias U.S. Holidays
january 1 00:00-00:00 ; New Years
monday -1 may 00:00-00:00 ; Memorial Day (last Monday in May)
july 4 00:00-00:00 ; Independence Day
monday 1 september 00:00-00:00 ; Labor Day (first Monday in September)
thursday -1 november 00:00-00:00 ; Thanksgiving (last Thursday in November)
december 25 00:00-00:00 ; Christmas
}
# This defines a modified "24x7" timeperiod that covers every day of the
# year, except for U.S. holidays (defined in the timeperiod above).
define timeperiod{
timeperiod_name 24x7_sans_holidays
alias 24x7 Sans Holidays
use us-holidays ; Get holiday exceptions from other timeperiod
sunday 00:00-24:00
monday 00:00-24:00
tuesday 00:00-24:00
wednesday 00:00-24:00
thursday 00:00-24:00
friday 00:00-24:00
saturday 00:00-24:00
}
define timeperiod{
timeperiod_name worktime
alias networkTime
sunday 06:00-23:59
monday 06:00-23:59
tuesday 06:00-23:59
wednesday 06:00-23:59
thursday 06:00-23:59
friday 06:00-23:59
saturday 06:00-23:59
}
#Check_put_file_path_log
define timeperiod{
timeperiod_name uploadfiletime
alias uploadfiletime
monday 00:00-24:00
tuesday 00:00-24:00
wednesday 00:00-24:00
thursday 00:00-24:00
friday 00:00-24:00
saturday 00:00-24:00
}
7、定义完成之后需要重启服务,即可生效
8、测试推送结果
手动执行之前定义的脚本,触发功能,观察飞书群中是否有对应的信息生成即可~。
/opt/ActivePython-2.7/bin/python /home/steve/feishu_monitor.py "$NOTIFICATIONTYPE$" "$SERVICEDESC$" "$HOSTALIAS$" "$HOSTADDRESS$" "$SERVICESTATE$" "$LONGDATETIME$" "$SERVICEOUTPUT$"
下面介绍nagios告警信息写入oracle数据库。
一、在 Oracle 所在服务器上安装
NRPE
#useradd nagios
# wget http://nchc.dl.sourceforge.net/sourceforge/nagios/nrpe-2.12.tar.gz
# tar xvfz nrpe-2.12.tar.gz
# cd nrpe-2.12
# ./configure--prefix=/usr/local/nagios
# make all
# make install-plugin
# make install-daemon
# make install-daemon-config
# make install-xinetd
注意点:
1.由于 nagios 脚本需要读取 oracle 相关文件。所以运行 nagios 的用户需要定义为 oracle
服务用户。并且修改 /etc/xinted.d/nrpe 中的配置。
service nrpe
{
flags=REUSE
socket_type=stream
port=5666
wait=no
user=oracle
group=nagios
server= /usr/local/nagios/bin/nrpe
server_args= -c /usr/local/nagios/etc/nrpe.cfg --inetd
log_on_failure += USERID
disable=no
only_from=127.0.0.1 10.0.0.99
}
2.将nagios服务器上libexec目录中的check_oracle和utils.sh拷贝到oracle服务器的libexec目录中,并修改
check_oracle 脚本。
export ORACLE_SID=orcl
export ORACLE_BASE=/u01/app/oracle
export ORACLE_HOME=$ORACLE_BASE/product/11.2.0/dbhome_1
export PATH=$ORACLE_HOME/bin:$PATH
二、 配置 nrpe 服务
修改 /usr/local/nagios/etc/nrpe.cfg 文件。加入以下内容:
#Check Oracle
command[check_oracle_tns]=/usr/local/nagios/libexec/check_oracle --tns sid user password
command[check_oracle_db]=/usr/local/nagios/libexec/check_oracle --db sid user password
command[check_oracle_login]=/usr/local/nagios/libexec/check_oracle --login sid user password
command[check_oracle_cache]=/usr/local/nagios/libexec/check_oracle --cache sid user password 80 90
command[check_oracle_tablespace]=/usr/local/nagios/libexec/check_oracle --tablespace sid user password USERS 90 80
具体参数写法请参考 check_oracle –help。
添加nrpe端口号:
vi /etc/services
添加这个
nrpe 5666/tcp # NRPE
配置完成后,重启 xinetd 服务。
# service xinetd restart
测试nrpe:
./check_nrpe -H 127.0.0.1
NRPE v2.12
./check_oracle --tns orcl
./check_oracle --db orcl
./check_oracle --cache orcl
检查命令是否已经生效
说明nrpe安装成功。
三、配置 Nagios 服务端
1.安装 nrpe 脚本支持。—参考官方文档。
2.在nagios服务器端添加 nrpe 命令配置。修改 nagios/etc/objects/command.cfg 文件:
define command {
command_name check_nrpe
command_line $USER1$/check_nrpe -H $HOSTADDRESS$ -c $ARG1$
}
3.在nagios服务器端添加oracle主机配置文件,在 nagios/etc/objects 添加oracle
主机配置文件:oracle.cfg 。
define host {
use linux-server
host_name oracle
alias Oracle 10g
address 10.0.0.109
}
define service {
use generic-service
host_name oracle
service_description TNS Check
check_command check_nrpe!check_oracle_tns
}
define service {
use generic-service
host_name oracle
service_description DB Check
check_command check_nrpe!check_oracle_db
}
define service {
use generic-service
host_name oracle
service_description Login Check
check_command check_nrpe!check_oracle_login
}
define service {
use generic-service
host_name oracle
service_description Cache Check
check_command check_nrpe!check_oracle_cache
}
define service {
use generic-service
host_name oracle
service_description Tablespace Check
check_command check_nrpe!check_oracle_tablespace
}
上文就是小编为大家整理的Nagios篇之Nagios服务关联飞书实现消息告警,nagios告警信息写入oracle数据库。
国内(北京、上海、广州、深圳、成都、重庆、杭州、西安、武汉、苏州、郑州、南京、天津、长沙、东莞、宁波、佛山、合肥、青岛)睿象云智能运维平台软件分析、比较及推荐。
发表评论
暂时没有评论,来抢沙发吧~